Friday, August 30, 2013

How Ikea Saved Us Cash on Wedding Decorations

ikea, save, savings, money, wedding, ceremony, reception, wedding ceremony, decorations, DIY, candles, kohls, michaels, shopping

One of my favorite breakthroughs-- and perhaps the one that I'm most proud of-- during the wedding planning process was taking an inadvertent stroll through Ikea and realizing that so many of the products that we were using for decorations were available at the Swedish superstore... and drastically cheaper than other stores, too!  It was exciting as I loaded up my cart (although returning to Kohl's and Michaels to make massive returns wasn't nearly as exciting later) and realized how much money we'd be saving on our wedding decorations. 

Here, for your perusal, are the items that we purchased and the savings we garnered. 

Hemsjo - A pack of four pillar candles for $1.99. These were just slightly smaller, but I had previously spent $7.99 for a three-pack at Michaels. It was a fantastic feeling taking back the Michaels' candles. 
Savings: $64

Nyttja - A pack of two black picture frames for $2.99. I had bought almost identical black ones from Kohl's for $7.99 each and ended up returning them when I found the Nyttja at Ikea. We bought six frames-- one for each photo of our parents and grandparents' weddings. We repurposed those pictures and frames and created a gallery wall in our apartment-- so they did double duty!
Savings: $30


Sondrum  - One white picture frame for $3.99. We used these to frame our guestbook directions, card box note, and signature drink selections at the bar. Again, I had bought three white frames from Kohl's for $12.99 each.
Savings: $24

Haverdal- One white picture frame for $4.99. We used this 5x7 frame for one of our engagement pictures at our cake table. I had bought a white 5x7 frame similar to the Haverdal for $7.99 from Kohl's. 
Savings: $3

Bumerang- A pack of eight wooden hangers for $4.99. I bought these to make personalized hangers for my  two maids of honor and three bridesmaids. I had a difficult time finding wooden hangers at all; however, the cheapest already personalized ones I could find were on Etsy and were $15 or more. If you're interested in how I made the hangers, check out this post about them! 
Savings: $70

Bonus Find!
Glimma 24 oversized tealights for $5.99. These are bigger than an average votive, and perfectly fit into the glass votive holders that I had bought on sale from Bath and Body Works. This wasn't necessarily a savings, so much as an exciting find. Previous to finding the Glimma candles, I couldn't find any that were big enough to fill the holders. These were perfect


post signature

Sunday, August 25, 2013

DIY Wedding Table Numbers

We're back from attending a wedding in California, and I'm ready to share more wedding stuff with you! Yay! 

John and I met in college, but we only started dating after he was in the Navy. (We do things the hard way. Never the easy way for the two of us.)  Our entire relationship was long distance, so we thought it would be fun to name each table as a place that is important to our relationship. We tried to match each place with a coordinating picture. I don't think anyone noticed, but I set the table numbers up so they told our story-- the first guest table was where we met and the last was where we'll be PCS-ing next, with everything else in between in order.


You'll Need:
  • Microsoft Publisher (or other design program)
  • 5x7 photo paper
  • glue tape or glue dots (I found that the tape works wonders!)
  • 5.5x7.5 scrapbook card stock paper (I found a 100 pack at Michaels for about $8.)


How I Created the Look: 

I created a template using the generic 5x7 paper size on Microsoft Publisher and then dragged and dropped photos and text that I needed for each. (I also used grayscale in the program for the photos, so I didn't have to mess with creating and saving other copies of the pictures themselves.)

After I printed all of the cards, I rolled the glue tape on the back of each one, and centered it and pressed it onto a sheet of cardstock. 

We haven't gotten our professional pictures back yet, so I don't have any clear photos of how the tables looked at the wedding.  However, if you want to create this look for your own, we used small, black easel stands to prop the cards up. (A post about our centerpieces is to follow soon!)


Have you seen these other wedding posts?

post signature

Friday, August 23, 2013

August Sponsor Spotlight and Giveaway!

It's almost the end of August, and that means that I have another wonderful batch of bloggers who have given me the chance to promote their blogs and get to know them! Take a moment to get to know them too, and enter our month's giveaway! 

Meet Breanna from Sweet Silver Lining


I'm a 24 year old Registered Nurse from Minnesota who loves sparkles, country music, & the great city of Nashville, TN! On Sweet Silver Lining, I also blog about my life and things I love. I hope you'll stop by and stay for awhile!


Meet Alyssa from Impractical Composition! 


I'm Alyssa, married to Brandon, aka Brand.  I'm an ASU student studying social work by day, and an avid crocheter by night.  I blog about my impractical journey through life and everything in between.


Meet Natasha from The Artisan Life and Natasha's Nibbles and Noshes! 

I love creating things! When I'm not busy with work or my double load of grad school classes, I'm writing, taking pictures, creating items for my Etsy shop, attending craft fairs, and hanging out with my sailor. 


Meet Mrs. B. from The World Traveling Military Family


This small town Idaho girl met a small town West Virginia boy, we got married and have been traveling the world with the Air Force ever since!  We have lived in Alabama, Iceland, Japan, and are heading to Germany in Nov 2013.  I'm a labor doula, photographer, substitute teacher, wife, mother, DIY'er, crafter, just to list a few.  I love traveling to new locations, meeting amazing friends along the way, and of course posting all about our adventures!  


post signature

Thursday, August 15, 2013

Review: Cardstore

Disclaimer: I was contacted by the folks at Cardstore to try their service. I was compensated with a product for this review.All opinions and observations are mine. 

Cardstore is an online shop that sells unique greeting cards at an affordable price. The best thing, in my opinion is that there are so many card options to choose from. The topics are wide-ranging, unlike some brick-and-mortar card stores. All of the cards can be customized with text, and many of them can be with photos.

Since my youngest sister, Becky, is heading back to college and will need a little sunshine in her mailbox from time to time, I decided to order a card for her. Cardstore has the ability to send the card for you (as well as schedule cards and remind you about important dates like birthdays and anniversaries), but I didn't utilize this service since I wanted to wait to send it to her a bit later

I really enjoyed browsing the cards-- they're inventive and well designed! After looking, and looking, and looking for that perfect card, I came across the "Encouragement Cards" section. I finally settled on "You're the Sumo" because 1) how cute is that panda!? and 2) how cute is that panda!?  After customizing the inside text with some witty repartee that will (hopefully) make Becky laugh, I had the card shipped to my home address. (Did I mention they'll also print your return address on the envelope, which is awesome since we just moved here and I have no address labels!)


It's always a leap of faith to order something online and not be able to touch or see it. And that leap of faith is always a little bit harder when you're buying something to give to someone else. However, when I received the card, I was very happy with it's quality. It was definitely a card that I would have no problem sending to anyone, and consequently, a service that I would consider using again!

post signature

Tuesday, August 13, 2013

Guest Post: Finding a Great Post-Military Job

Emma contacted me this summer and asked if she could guest post on my blog. She's starting out in the blogosphere and wanted to make connections with other writers and their audiences. Typically, I don't post guest posts unless I solicit them; however, I thought that I'd pay it forward to a motivated gal trying to get her blog started! Drop on over to Smile as It Happens and say hi to Emma! 

The military offers great opportunities for thousands of individuals; unfortunately, when these individuals leave the military, they can sometimes have a difficult time transitioning back into civilian life. One of the keys to making this transition easier is to refrain from becoming overwhelmed with searching for a job. Individuals should always do their best to achieve their goals; however, they should also realize that finding their dream job is not an easy process. There are many myths associated with searching for a job, but once you understand the truth behind these myths, you will be prepared for a successful job search.

Myth #1: Jobs for veterans are limited and hard to find.

Truth: Although it may take time to find the perfect position, it is entirely possible to find a job that you will truly enjoy and find to be fulfilling. The 100,000 Jobs Mission and other similar programs are great resources for veterans to use when looking for a post-military job. These programs allow applicants to see the pay, job outlook, and the degree needed for each job listing.

Myth #2: I will have a hard time getting a new job because I was fired from a previous position.

Truth: Luckily, most companies will not have any idea that you have been fired unless you decide to disclose this to them. Even if the company knows about your termination from another job, you should not let it be an obstacle in acquiring another position. As long as you do well in the interview, the company will be able to decide if you are a good fit for the company, regardless of what has happened in your past.

Myth #3: I will have a difficult time finding a job, since I’ve been in the military for so long.

Truth: Many companies are interested in hiring veterans and value the unique set of skills that former soldiers possess. Recruit Military is a program that helps military veterans find jobs and works to ease the transition into the civilian workforce. Programs such as this put job applicants in direct contact with companies who are often looking to specifically hire military veterans.

Myth #4: It is too time consuming to ask people for referrals and people see it as annoying.

Truth: Most likely, the people that you have worked with throughout your career will be more than willing to offer you a great referral. In addition to asking someone for a referral in person, an applicant can also ask by sending an email or making a phone call. Some companies have worked to make the referral process even easier by partnering with companies like JIBE. These services allow you to connect with referrals using social media sites such as LinkedIn and Facebook.


Emma is a mid 20-something year old with a passion for life, love, fitness, and helping others. She loves to be active and get involved in as many sport and community activities as possible. Emma is currently studying to become a Career & Life Coach, and loves to network with people from around the world! Check out Emma’s blog at smileasithappens.blogspot.com!


post signature

Monday, August 12, 2013

DIY Wedding Ceremony Decorations

Warning: This post is just a cheap excuse to post pictures of our wedding. 


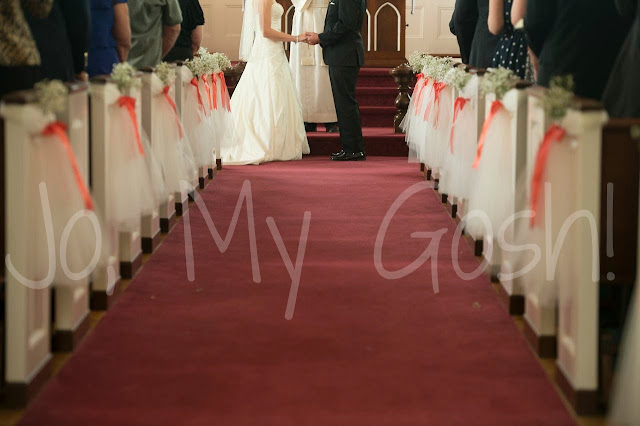
John and I were married in my home church, which is already very ornate, so we didn't have much to do to decorate for the ceremony. The biggest decoration project for the ceremony were pew bows. I just loved them. They were simple, elegant, and added a touch of color without being obnoxious. They took so little time to make, too. 

 You'll Need:


  • 1 1/2 yards of netting per pew
  • 1 yard of ribbon per pew (we used 1 1/2 inch ribbon)
  • 1 bunch of Baby's Breath per pew
  • twisties or clear tape
  • scissors
Directions:


  1. Pull the netting around the top of the pew so that the ends are even with each other. Bunch the netting and pull it together in the middle of the pew. Use a twisty or clear tape instead of a knot to secure the netting to itself.
  2. Using the ribbon, tie a bow around the twisty or clear tape.
  3. To finish the ends of the ribbon: Fold the ends of the ribbon horizontally in half and cut 1/2 inch- 1 inch  diagonal line from the outer corner of the ribbon to the end of the folded edge.
  4. Slip the Baby's Breath into the middle of the knot. 


And here are a bunch of pictures from the ceremony so you can see these nifty pew bows in action. The photos are taken by our photographer, Andy Colwell.


post signature

Friday, August 9, 2013

My Etsy Wedding Jewelry Picks

Jewelry was one of the hardest decisions I made for the wedding, just because I wasn't sure what I wanted. And then, when I knew what I wanted, I couldn't find it. After (no lie) hours of Etsy and Pinterest searching, I found two shops that I couldn't have been happier with.

This is not a sponsored post (none of my wedding posts are). I just want to pass on two fantastic shops to you guys because I am so happy with their products and the glitz they added to the wedding.

My Jewelry

I fell in love with the jewelry set from Be Yourself Jewelry. My dress had clear beading and pearls on it, so I knew that I wanted my jewelry to follow suit. The set even came in white or ivory, which was awesome for my neurosis-- my dress was ivory and white jewelry just wouldn't do. The whole shebang was expensive-- I bought the earrings and necklace as a set and then added the bracelet -- but I felt like a model the day of the wedding. It was worth it.


My Bridesmaids' Jewelry

For my wonderful bridesmaids, I wanted something glitzy with pearl accents. I could not have been happier with the jewelry that Phaness created-- simple, elegant, and it fit so beautifully with their dresses. The owner/designer/creator, America, was so easy to work with. She was very communicative, and almost instantly responded to every single email.  When I received the shipment of jewelry (I also ended up buying my sisters-in-law and honor attendants jewelry from her because I just loved it), it came all pretty-like:

I tried to find a photo of at least one of my bridesmaids wearing the jewelry. None of the ones I have (right now) are close enough to show the detail! Sorry!

Have you seen these other wedding posts?
post signature

Tuesday, August 6, 2013

DIY Personalized Bridesmaids Dress Hangers


Pinterest, while it's really cool, and neat, and inventive and yadda yadda, is also the devil. It makes neurotic, OCD, crazy brides (not unlike myself) have unreasonably insane expectations for everything wedding.  (By the way, have you checked out my new Pinterest wedding board? You totally should! I'm happy to spread the crazy around!)

Through my hundreds of hours spent Pinteresting and looking through thousands of wedding pins, I noticed this very cool, but very expensive, trend of personalized dress hangers. There are many iterations of them-- some of them DIY-- but the pins mostly end at Etsy shops that charges upwards of $15 or more per hanger. 

Is it just me, or is that nuts? Hangers are cool and everything, but I wanted to get my bridesmaids something more meaningful than an artfully crafted hanger.

But, being a slightly neurotic bride, I still wanted the hangers for those cute "before getting ready" photo opportunities.

Not to mention, I knew that my girls would think the personalized hangers were cute.   I wasn't sure how I was going to DIY these bad boys.

And then a trip to Ikea happened.

Did you know that Ikea sells painted, wooden hangers? For $4.99 for an 8-pack?  They do. They're called Bumerang. I bought in white,  but they also have them in natural wood, grey/brown, and black. Essentially, they can match any wedding color palette.
You'll Need:
  • Letter stickers (I bought mine from Michaels, from the scrapbooking sticker section. These are heavy-duty stickers that are plastic-backed, rather than paper-backed with rhinestones and glitter.)
  • Ikea hangers
  • 8 inches of 3/8 inch ribbon per hanger
Place the stickers where you want them to be, add titles if you're so inclined, and then tie on a ribbon to add a little pizzazz and color! 

My hangers each cost about $2, and that's a generous estimate. I love the way they turned out (even though we forgot to use them the day of the wedding)!


Have you seen these other wedding posts?
post signature


Monday, August 5, 2013

Pearl-Studded Wedding Rice Bags


Today's wedding craft is so easy, that I am almost embarrassed to post it. However, in my last year of checking out wedding magazines, websites, and Pinterest boards, I haven't seen this idea pop up anywhere else, so I wanted to share it with you!

You might remember that our wedding palette was black with pops of guava, yellow, and orange. I also used pearls as a theme (which you can see evidence of in our wedding invitations). These rice bags were a small detail, but one that I really enjoyed designing and making because they drew the elements of our wedding together. Not to mention, it was something that John was able to help me with when he came home! Win all the way around!


You'll Need:
  • craft bags (found at Michaels)
  • stick-on 3/8 inch pearls (found at Michaels)
  • wildlife-safe wedding rice (found at Michaels and at Amazon)
  • tablespoon
Directions:
  1. Measure out one tablespoon of rice into each bag. 
  2. Fold the top of the bag down and crease.
  3. Press a stick-on pearl onto the middle of the flap to secure.

Have you seen these other wedding posts?

post signature